
Access Section
The information on this page is intended for health professionals reference and use only. If you are a parent or family member looking for information about treatment, please visit unit information.
Contents
1.0 Aim of guideline
2.0 Scope of guideline
3.0 Guideline summary
4.0 Guideline framework
4.1 Background information
4.2 General care principles for central lines
4.3 Longlines
4.4 Tunnelled central venous lines
4.5 Arterial lines
Appendix 1 – Medication administration via a tunnelled central line – Bolus
Appendix 2 – Medication administration via a tunnelled central line – Infusion
Appendix 3 – Blood sampling from an arterial line (umbilical or peripheral)
Appendix 4 – Vascular Access Guideline: What and Where
Version control
1.0 Aim of Guideline
This guideline has been produced to guide staff in their care of neonates who have a central line insitu. They are based on research finding and/ or currently agreed best practice. For accessibility the guideline has been structured under distinct subheadings; however the reader is advised to read the guideline in full and to seek advice and support of a more senior or experienced colleague in the practice setting.
2.0 Scope of Guideline
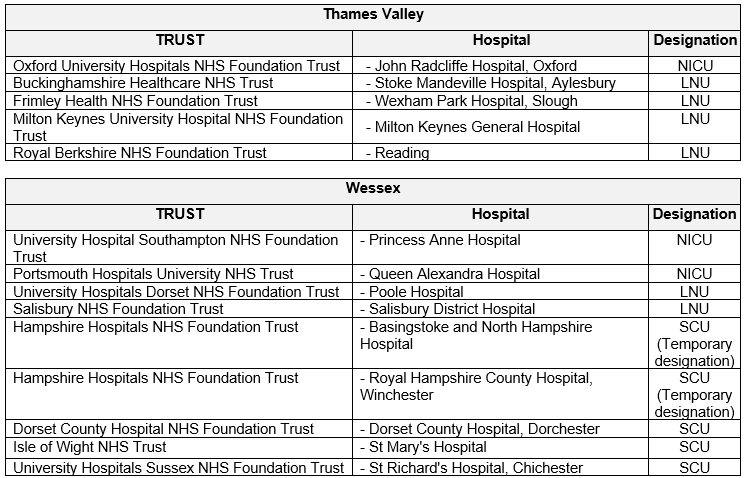
The guideline applies to all Neonatal Units covered by Thames Valley & Wessex Neonatal ODN. This includes the following hospitals:
3.0 Guideline Summary (Introduction)
- Principles of asepsis must be adhered to whenever a Longline/ Tunnelled line/ Umbilical Line is accessed to administer a medication or to change an existing infusion.
- Individuals must use ANTT or strict 2-person aseptic technique- according to local trust policy.
- Before a central line can be used its position must be confirmed on x ray. In the meantime, fluid must be administered through it to keep it patent. This will usually be 0.5ml/hr of 0.9% saline, through a syringe pump.
- Every hour nursing staff must check for signs of infiltration and /or extravasation:
- Check and record the pressure of the infusion pumps.
- Inspect the infusion site and document the Visual Infusing Phlebitis (VIP) score.
- Extra caution is required if vaso-compressive agents, concentrated electrolyte solutions or hyperosmolar agents are being administered.
Longlines
- Longline entrance sites must always have an appropriate dressing, which will provide a protective barrier for the catheter entrance site.
- Never administer bolus medication or ‘stat’ fluids by manual flushing / bolusing of a syringe.
- Never administer blood products through a longline catheter.
- Never aspirate from a longline catheter.
- Always ensure an infusion of a minimum of 0.5ml/hr running through the longline.
Tunnelled lines
- There will be a neck insertion site. In the first week after insertion this site should be kept clean and dry.
- There will be a chest exit site. The line must always have an appropriate dressing which provides a protective barrier for the catheter entrance site. It should be secured here, so there is a ‘loop’ in the line. This is intended to prevent the line moving if it is accidentally ‘tugged’.
- If the line is receiving only intermittent use the line exit site should be checked each time the line is accessed and at least once in any twelve-hour period.
- To flush a tunnelled line, always use a 10ml syringe.
- It is not appropriate to try and aspirate blood samples from the small single lumen tunnelled lines, which are used for babies on the neonatal unit.
Umbilical lines
- Always ensure an infusion of a minimum of 0.5ml/hr running through an umbilical line.
- Arterial lines must be clearly labelled, to distinguish between venous and arterial catheters.
- Drugs and hypertonic solutions must never be given via an arterial line.
- It is imperative not to allow air to enter the system.
- Only a trained and competent practitioner may withdraw blood.
- Staff must be vigilant for look for signs of haemorrhage or thrombosis, which can have serious consequences for morbidity and mortality.
- Every hour the perfusion and blood flow to the trunk and lower limbs must be checked and documented. Any changes in colour, warmth, capillary refill must be reported to the medical team.
4.0 Guideline Framework
Staff who use a central line (CL) or care for a baby with one must be trained and undergo competency assessment before caring independently for such a baby. This varies between hospital trusts, but would usually include completion of an e-learning course, a period of supervised practice and an assessment of competence. Readers should be aware that reading this guideline is a helpful part of this process, but should not be considered a guarantee of competence to administer intravenous medication via a CL or care for a baby with a CL.
4.1 Background Information
This guideline will cover the nursing care of the commonest types of central line used on neonatal units. This will include; longlines, tunnelled lines and umbilical venous or arterial lines. Care of peripheral arterial lines will also be listed, highlighting if and how it varies from a central arterial line.
For clarity the guideline will be divided up into four distinct sections. Firstly a section outlining the general care of central lines, then three separate sections outlining care for particular types of central line. One on Longline care, one on Tunnelled line care and one on Umbilical Line care.
4.2 General care principles for central lines
4.21 Infection prevention and reduction
- Catheter related blood stream infections are the most frequent nosocomial infections in neonatal units and are a major cause of morbidity.
- Catheter related blood stream infections (CR-BSI) are caused by cutaneous micro-organisms contaminating the catheter either during insertion or from migration along the catheter track.
- Micro-organisms from the hands of the health workers can also contaminate and colonise the catheter hub during care interventions.
- Evidence has shown that the use of central venous catheter insertion guidelines, together with a method for monitoring usage of these guidelines, has been shown to significantly reduce the incidence of CR-BSI in intensive care units (DOH 2007).
- The use of antimicrobial impregnated catheters, and/ or 2% chlorhexidine gluconate in 70% alcohol, for cleaning catheter hubs prior to use, are two of the more recent methods used on some neonatal units to reduce CR-BSI frequency.
- Careful infection reduction precautions and practices, by nursing staff caring for and accessing these lines can also significantly reduce the chance of infection occurring. These practices, sometimes known as a ‘care bundle’ include;
- Prior to accessing any part of a central line system, hands must be decontaminated in accordance with trust’s hand hygiene policy.
- Use ANTT or strict 2-person aseptic technique when accessing a central line- according to local trust policy.
- Scrub access port or hub with friction immediately prior to each use with an appropriate antiseptic (type according to local policy).
- Only use sterile devices to access catheter/ line.
- Immediately replace dressings that are wet, soiled or dislodged.
- Change administration sets according to locally agreed policy.
- Consider antiseptic impregnated caps for access ports.
- Consider daily whether a central line is still required and promptly remove unnecessary central lines.
- Nursing staff should be aware of medical insertion guidelines for central lines and feel empowered to stop a procedure, and/ or express concern if proper procedures are not followed.
4.22 Staff support/ education
- An evidence-based guideline should be available to guide staff in their care of a baby with a central line.
- Staff involved in the care of any central line should receive appropriate training in the care of the line. This would usually require staff to complete a separate competency assessment document for long lines, arterial lines and tunnelled lines, before working independently.
- Staff should be made aware of any policy changes and be given training/ education to remain up to date with local equipment and best practice.
- Staff must practice within their professional competency and adhere to their Trust’s policy in the care of the central line.
- Advice and ongoing support should be available from specialist hospital staff such as the practice education team, nurse in charge or infection control team.
4.23 Infiltration and extravasation
- Infiltration is the inadvertent leakage of a non-vesicant solution from its intended vascular pathway (vein usually) into the surrounding tissue. This can be a benign event as it generally does not lead to tissue necrosis. However, a large volume of infiltrate can cause compression of nerves and acute limb compartment syndrome (ALCS) resulting in long-term disability.
- Extravasation is the inadvertent leakage of a vesicant solution from its intended vascular pathway (vein) into the surrounding tissue. A vesicant refers to any medicine or fluid with the potential to cause blisters, severe tissue injury (skin/tendons/muscle) or necrosis if it escapes from the intended venous pathway.
- Concentration of vesicant; the amount extravasated; and the type of vesicant are all factors which will influence the severity of the extravasation and the degree of injury ranges from mild skin reaction to severe necrosis.
- Vesicant drugs and solutions frequently reported to cause extravasation injury include;
- Commonly used medications such as Vancomycin, Gentamicin, Phenytoin, Amphotericin or Cefotaxime.
- Vaso-compressive agents such as Dobutamine, Dopamine, Adrenaline.
- Concentrated electrolyte solutions such as Calcium chloride, Calcium gluconate 10%, Sodium bicarbonate 4.2% & 8.4%.
- Hyperosmolar agents such as Total parenteral nutrition, >10% dextrose.
- Risk factors for infiltration and extravasation can be device-related, drug-related, patient-related and clinician-related factors. See examples below;
- Line surgically placed in an area prone to movement, therefore difficult to secure effectively.
- Inadequately secured catheter.
- Flushing line with a small gauge syringe.
- Administering large volumes of fluid / medication through a line.
- Medication has an extreme pH (<5 or >9), a high osmolality or causes vasoconstriction.
- Baby is very active.
- Baby has very small, fragile, thrombosed veins.
4.24 Prevention of infiltration/ extravasation
- The pressure of the infusion pump must be monitored and documented at least hourly, along with the initials of the person doing so, on the baby’s fluid chart.
- The infusion site must be inspected at least every 60 minutes and documented when in use and if extravasation or infiltration is suspected. Observe for any erythema or oedema.
- Be aware that the site of infiltration or extravasation for a central line is unlikely to be where the line enters the baby’s skin. Instead, it is most likely to be in the area over where the line tip is sited, within the baby. For example; a line tip placed in the inferior vena cava would be likely to show swelling/ oedema in the right chest area. Therefore, nursing staff should be aware of the position of the line tip, for each baby in their care, and ensure that checking of the line site is guided by this.
- Be aware that if a central line is in place for a long period of time, for example several weeks, the tip position may change internally, as the baby grows. In particular, long lines that were originally correctly placed, may become ‘short’ as the length of the baby’s limbs increases over time. This can be monitored if staff take care to check the line tip position- every time the baby has an x- ray where the line is visible.
- The pressure alarm limit must be set when an infusion is commenced and rechecked at the beginning of each shift, if running continuously.
- Record pump pressures and site monitoring on the fluid balance charts as per hospital policy.
- A rise in pressure must be investigated, however the pressure reading should not be the sole indicator for an extravasation. Swelling of the tip site, pain experienced by the baby, the inability to aspirate blood (from a tunnelled line) or an unexplained drop in blood sugar (if the fluid running is maintenance fluid) are all possible signs of infiltration/ extravasation.
- Vesicant drugs/fluids must be administered in concentrations recommended by the manufacturers/ pharmacy protocol.
- Where possible vesicants should be administered first in a sequence of medications, as vascular integrity decreases over time and also the vein is less irritated initially.
- Early intervention and identification of the first signs and symptoms of infiltration and extravasation is crucial, in order to prevent serious adverse outcomes
- Immediately stop the infusion/injection.
- Leave the line in situ (in case it can be used to facilitate treatment).
- Aspirate as much of the residual drug as possible to minimise the injury caused by the residue of the drug.
- If a limb/ side of the torso is affected it should be elevated.
- Continue monitoring the site, as signs such as erythema/ulceration can be delayed for 48 hours post-extravasation.
- Treatment will be determined by the plastic surgeon but may include:
-
- Monitoring – the site will be observed, elevated and monitored to determine whether further treatment is required.
- Invasive management- this involves a hyaluronidase and saline washout using the extravasation kit, a procedure that dilutes the extravasated drug in the tissue.
4.25 Double lumen lines
- A larger baby may have a double lumen central line placed. This means that the line has two lumens enclosed within one outer catheter.
- Each lumen remains separate, so medications do not mix in the line and the flow of blood past the catheter tip is so great that mixing does not occur. This is particularly useful if a baby has medications that are incompatible with each other, or simply has a large number of infusions.
- For a double lumen long line to remain patent, both lumens must run with an infusion rate of at least 0.5ml/hr running through them.
- A positive pressure needleless connector (for example ‘Max Zero TM’) if available, can be applied to the end of the spare lumen, when it is flushed off. It has special properties which keep the fluid in the ‘bung’ at a pressure level which maintains line patency and prevents entry of blood or other fluid or cells which might cause the line to clot.
- A positive pressure needleless connector cannot be used on two lumens of an umbilical line at the same time- as a minimum of 0.5ml hr of fluid must always be running via one lumen to prevent clots forming at the line tip.
- Tunnelled lines have a wider bore than a neonatal long line and if ‘flushed off’ using the appropriate method- do not have to have fluid running continuously through them. Instead, they only require weekly flushing in a hospital setting. See section 4.47 below, or on page 21 of pdf of guideline.
- All manufactured double lumen lines have a primary and a secondary lumen, this is usually apparent through colour coded end parts. Staff should ensure they can identify the primary and secondary ports for the lines used in their hospital.
- To reduce the risk of extravasation the fluids running at the highest rate should always be run through the primary port.
4.3 Longlines
Longlines are a type of central venous line, which are peripherally inserted central venous catheters (PICC), commonly used in neonates for central venous access. They are peripherally inserted via an upper or lower limb vein and then threaded to the superior vena cava (SVC) if an upper limb is used (eg brachial or cephalic vein.). Or they are threaded to the inferior vena cava (IVC) if inserted via a lower limb vein (eg femoral or saphenous vein).
They are used in neonates because of the small lumen size of the catheter and because they can remain insitu for 4-6 weeks, making them ideal for medium term use, often required by neonates.
The presence of a neonatal longline has risks which include:
- Vascular compromise
- Pleural and pericardial effusion
- Occlusion/obstruction of the vessel
- Thrombosis
- Catheter related sepsis
- Tip migration
- Leakage and breakage
4.31 Insertion of longline
- The longline will be inserted by the medical team or nurse practitioner, but the nurse caring for the baby will need to;
- Position the baby so that they will be comfortable and safe during the procedure. For example so the baby is nested, the limb the line will be sited in is uppermost and can be accessed without excessive twisting or manipulating.
- Ensure that procedural lights will not be beaming into the baby’s face. Sometimes it will be best for a baby to wear phototherapy eye protection for the duration of the procedure.
- Assist with opening or passing equipment as required during the procedure.
- Stand by the baby and offer them comfort. For example a pacifier for non-nutritive sucking, comfort holding, and/ or a finger to hold.
- A large and vigorous baby may require gentle restraint to stop them moving, so that the procedure can be performed safely.
- If a parent will be present, explain the procedure to them, and explain how they can support their own baby.

4.32 Longline dressing
- Longline exit sites must always have an appropriate dressing, which will provide a protective barrier for the catheter entrance site. A dressing which is adequately applied will assist in preventing Longline migration, leakage and catheter related blood stream infections.
- The person siting the line will apply the dressing, but as nurse caring for a baby with a longline you should ensure;
- The line is coiled smoothly under the dressing, as any sharp kink in the line can mean fluids will not run through it, but instead alarm high pressure.
- The ‘hub’ part of the line is not positioned directly on the skin, but placed on a small piece of gauze, to reduce the risk of pressure damage.
- The external parts of the longline (ie the thin white line and the hub) are enclosed within the dressing.
- The dressing should not encircle the whole limb, or the baby’s movement will be restricted, and their circulation may be affected.

4.33 Confirmation of Longline position
- Before a longline can be used its position must be confirmed.
- Neonatal sized longlines cannot be aspirated, so checking for blood return is NOT a means for position assessment. Longline position must therefore be checked by performing a chest X ray or Point of Care Ultra Sound scan (POCUS) to visualise the position of the line tip. POCUS is a relatively recent method used to confirm neonatal longline position, so may not yet be utilised in all Neonatal Units.
- Confirming the position of the longline tip inside the baby is important, to help minimise the risk of cardiac tamponade, which can pose serious health risks and may result in death.
- The x-ray or ultrasound images will be reviewed by the medical team or specifically trained nurse practitioners. If the line is in the correct position, they will confirm this to the nurse looking after the baby and it will them be possible to commence administration of fluid and medication through the line.
- If the longline position is in the incorrect position, then the medical team or nurse practitioner team can pull it back by 1-4cm, as required but cannot push the line in further, for sterility reasons.
- Position complications can mean that it is necessary to remove or replace a longline shortly after it is inserted.
4.34 On-going care and maintenance
- Principles of asepsis must be adhered to whenever the longline is accessed to administer a medication or to change an existing infusion. An aseptic non touch technique (ANTT) must be used.
- The administration of drugs through a longline must be performed by a registered practitioner who is trained and deemed competent in carrying out this procedure.
- The local NHS Trust’s policy for administration of medicines must be adhered to when administering fluids and drugs via the central venous catheter.
- Neonatal longlines have very small lumen sizes (Size 1 FR and size 2 FR) which means there are essential factors for care which must be undertaken to reduce the risks of complications e.g. line occlusion, bursting and snapping of the catheters. These are;
- Never administer bolus fluids through the catheter. This may result in the catheter bursting due to the low-pressure tolerance and burst strengths of the longline.
- Medication must be given as an infusion, using a pressure and volume controlled pump, even if it is can theoretically be given as a bolus. For example, if administering iv antibiotics when no peripheral line is available. This will minimise the risk of catheter rupture, which can occur due to high pressure in the line during bolus administration.
- Never administer blood products through the catheter. Due to the small lumen size, the blood products may clot and occlude the Longline.
- Never aspirate from the Catheter. Due to the soft lumen, this may result in trauma or vessel irritation.
- Always ensure an infusion of a minimum of 0.5ml/hr running through the Longline (e.g. 0.9% Sodium Chloride). This can be a syringe pump or infusion pump and is intended to reduce the risk of the Longline occluding.
- All Longline care should be documented to keep clear and accurate records.
- Regular observations and routine assessments should be clearly and concisely documented in the health care records to include
- Longline type and date of insertion
- Size of Longline inserted
- Length of Longline inserted
- Visual Infusing Phlebitis (VIP) score
- Dressing information including time and date last changed
- Observation of entry site at each dressing change
- Frequency of fluid changes will be dictated by local unit policy. However for guidance, standard practice on most units is;
- Fluid should be changed every 72 hours for intravenous fluids without additives.
- Intravenous lines with additives should be changed 24 hourly, due to possible instability after that time.
- Total Parenteral Nutrition (TPN) administration sets and bags should be changed every 24 hours.
- Some drugs require the giving sets to be changed more frequently.
- Lines should be labelled as per the line labelling policy of each unit.
- Longlines may be flushed when assessing for patency if occlusion is suspected. These Longlines are stiff to flush and this can often be mistaken for the Longline being blocked.
- If flushing the Longline, no more than 1ml should be used and a 10ml luer lock syringe must be used. Using a 10ml syringe ensures that the optimal pressure is achieved.
- Pressure limits on infusions pumps must be set according to local policy and is often dictated by the line size and the manufacturer guidance. This is usually between 0 and 200-400 mmHg upper pressure limit.
- If a baby with a longline deteriorates due to an unknown reason, always consider whether the cause could be due to extravasation. Or if a pleural effusion is identified on an chest x-ray and there is a long line inserted on the same side (either arm or leg) consider an extravasation.
- Longlines have low infection rates and low risks of complications, so it is recommended that dressing changes are not performed routinely but only be changed on an ‘as required’ basis. The need to change a dressing should be determined from visually assessing the site and identifying that the line or skin integrity is at risk.
- Indications for dressing change
- The dressing integrity appears affected or is lifting
- If the hub or any part of the entrance of the longline has become exposed
- If the loop has become uncoiled or is pulling and the longline position may be compromised
- If the Longline or skin is visibly dirty or oozing blood/serous fluid where it is affecting the dressing integrity
- If it appears to have any signs of infection such as redness, swelling, purulent ooze.
- The site must be regularly assessed for signs of
- Redness
- Swelling
- Oozing
- Phlebitis
- Tracking
- In the event of a damaged or broken catheter, it must be removed and replaced. These longlines cannot be repaired.
4.35 Removal of Longlines
- Removal of longlines must be discussed and agreed with the medical team. A line will not be removed unless it is felt not to be required anymore, as it is difficult and uncomfortable to site a new one. Usually, a baby will have achieved full feeds or be very close to this point. On some occasions a line will need to be removed because the baby has an infection, and the line is thought to be the source of this infection.
- Longlines may only be removed by a nurse or doctor trained and competent in doing so, because neonatal longlines have a high risk of breaking or snapping during removal.
- The catheter will be removed in small stages, approximately 1cm at a time with pauses in between, with no pressure being applied at insertion site.
- Steady and gentle traction will be used starting at the insertion site, with the process taking approximately 60 seconds.
The guideline written above about care of a Long Line can be applied to care of the Umbilical Venous Catheter (UVC). Practice that deviates from or is additional to that outlined above, is provided below.
- See section 4.51 Insertion of an Umbilical Arterial Catheter.
- See section 4.52 Confirmation of Umbilical Arterial Catheter position.
4.36 Points specific to caring for a baby with an Umbilical Venous Catheter
- The umbilical site must be exposed and continually observed, so the neonate must be nursed in an intensive care area and not left unattended.
- The baby must be nursed in an incubator or under a radiant heater. This will enable the baby to be nursed exposed, ensuring the insertion site can be easily observed.
- The baby should have ECG lead monitoring, to continuously check for arrhythmias and general deterioration.
- The length of insertion of a UVC must be documented at the time of insertion, and then rechecked at least once in each shift.
- Avoid nursing the baby prone when a UVC is in situ. If the baby must positioned prone an adequate period of observation of the umbilicus should occur before this occurs. Ideally the cord should be dried around the line, rather than moist. Some units will lay the baby on something white that would wick the blood, making any blood loss more likely to be noted.
4.4 Tunnelled central venous lines
Tunnelled central venous catheters are commonly referred to as Hickman lines. Historically the brand name of Hickman® has been used to refer to all different types of tunnelled lines. However a range of brands exist including Hickman , Broviac® and Cook® catheter, so these should all be referred to as Tunnelled Central Venous Lines (tunnelled line).
These tunnelled lines usually have one lumen in neonates, due to their small size. However, these lines can have one, two or three separate lumens in older/ larger children. Tunnelled lines have a tissue ingrowth cuff to help secure them, as they are usually used for medium to long term use. Tunnelled lines can be inserted either by interventional radiologists (IR) or surgeons, and all neonates who require one, will have it placed under a general anaesthetic.

4.41 After insertion
- The position of the catheter tip must be determined radiographically and documented in the patient’s notes, before the catheter is used. This x-ray will be performed in the radiology department or operating theatre. The operative record should state whether this has been completed.
- Medication and/ or fluid should not be run through the line it until this position has been confirmed.
- Information about the line insertion should be documented by the person who sited the line. This information should then be safely filed in the baby’s notes. This information should include;
- line manufacturer
- insertion date
- site of placement
- placer’s details
- device lot number and product code
- catheter size (possible catheter volume) particularly useful as information will be required for:
- medication administration
- blood sampling
- thrombolytic administration
- catheter repair
- facilitate audit/research
4.42 Care of the neck insertion site
- As the line is inserted via a skin tunnel in the chest, there will be a neck insertion site.
- Wound closure strips, are usually used, and need to be removed after a week if still in situ.
- The site should be kept clean and dry during this period; a dressing is not usually required.
- Observe for any oozing from the site; pressure may need to be applied if blood is still oozing post-operatively.
- Observe carefully for infection & consider covering the site with an occlusive dressing.
4.43 Care of the chest exit site
- The line will have been secured by suturing the catheter to the neonate’s skin. This is necessary because there is an increased risk of catheter migration, phlebitis, granuloma and infection if the catheter is not adequately secured.
- The line should have been secured so there is a ‘loop’ in the line, often wound closure strips are used to create and secure this ‘loop’. This is intended to prevent the line moving if it is accidentally ‘tugged’. As the loop will come undone, rather than the line moving.
- Transparent semi-permeable dressing is usually applied in theatre, over the top of the wound closure strips.
- Observe for any oozing from the site, pressure may need to be applied if blood is still oozing post-operatively. This can be done by applying a pack of sterile gauze as a pressure dressing over the theatre dressing. This can be secured firmly with suitable tape. The site must be reviewed frequently to observe for further bleeding.
- If bleeding is a problem, pressure is usually applied over the line exit site, but consideration must also be given to the neck insertion site where the bleeding may be originating from, as the line enters the venous system at that point.
- If bleeding continues, the baby’s current platelets/clotting level may also need to be reviewed and appropriate transfusions may be required.
4.44 Ongoing care
- Principles of asepsis must be adhered to whenever the tunnelled line is accessed to administer a medication or to change an existing infusion. An aseptic non touch technique (ANTT) must be used.
- If the line is in in continuous use it should be checked hourly and a VIP score documented.
- It is usual to give a VIP score for the site where the line exits the neonate. However, be aware that the exit site for the line is not the site where swelling or leakage of fluid would be likely to occur if there is a problem with the line. This would be at the neck insertion site, where the line enters the venous system internally. See medical notes for precise location in each patient.
- If the line is receiving only intermittent use the line exit site should be checked each time the line is accessed and at least once in any twelve hour period.
- Observe the dressing whether it is intact, and clean and dry.
- Ensure the ‘loop’ remains fixed securely under the dressing.
- Visualise the skin through the dressing for signs of
- Redness
- Swelling
- Oozing
- Phlebitis
- The line should be protected from sharp objects, twisting, stretching and tension place on the line.
- Document any changes or concerns and report to the medical team.
- The dressing should be changed at least every week, if not required sooner.
4.45 Flushing for general use
- It is important to use the correct size of syringe for flushing the line, as use of the wrong sized syringe can lead to accidental damage of the line.
- To flush a line always use a 10ml syringe. The larger volume of this size syringe exerts a lower pressure on the line and means that you will notice an obstruction within the line.
- Excessive force must never be used when flushing the line. If high resistance is felt, stop what you are doing, clamp the line if no continuous background fluid is running, and speak urgently to a senior colleague. (see more details in section 4.46 below)
- Once you have flushed with a 10ml syringe and found the line to be patent, then a smaller sized syringe can be used to administer medication, if that size is required for accuracy.
- It is safest to use a larger syringe for a tunnelled line, as a smaller syringes (1-5ml volume) can generate high internal pressures, with very little force from the user. The line user may then be unaware they are damaging the line, as most of it sits inside the neonate’s vascular system and cannot be visualised externally.
- Use a positive pressure when flushing off a line to help maintain its patency. This involves giving a smooth flush, and clamping the line whilst flushing, but stopping the flush immediately after. The use of positive pressure helps to prevent a vacuum forming after completion of the flush, preventing blood being sucked (refluxing) back into the catheter. This will help to prevent catheter occlusion.
- A turbulent (push /pause) flushing technique can be used if you are concerned about medication or blood residue remaining in the internal lumen of the catheter. When first accessing the tunnelled line, administer 1-2mls of the flush using a smooth and gentle pressure, to assess the patency of the catheter. Then firmly pulsate 1ml at a time into the catheter, so creating ‘turbulent flow’ within the lumen, and thereby decreasing the risk of fibrin and platelets becoming adhered to the internal wall of the line and minimising occlusion.
4.46 Flushing problems
- If any of the following occurs, stop flushing a line immediately and assess further;
- Resistance is felt (never flush against resistance due to the risk of catheter damage).
- The baby appears to be in pain.
- If unable to inject the fluid.
- Swelling is observed along the skin tunnel, around the chest site or in the neck area.
- Leakage of fluid from the catheter or exit site.
- Clamp off the line, if continuous background fluid is not running, or will now not run. Then speak to the primary medical team urgently.
- Refer to section 4.415 Line occlusions, on page 25 (of pdf guideline), for further details.
4.47 Flushing off a line, not in continuous use
- Low dose heparin flushes are frequently used to flush the lumens of a tunnelled line between uses, in an attempt to prevent thrombus formation and to prolong the duration of catheter patency. However, the efficacy of this practice is unclear, and protocol will vary between hospital trusts.
- When not in use, tunnelled lines require routine flushes to maintain their patency. This will be at least weekly for a baby on the neonatal unit.
- The volume of the flush solution should be equal to at least twice the volume of the catheter and add on devices. This will usually be 2-3 mls of a heparin saline flush, of 10 units of heparin per ml of saline. This can be obtained in manufactured vials, through the hospital pharmacy.
- Decreasing unnecessary exposure to heparin is important to minimise adverse effects associated with heparin use, e.g. autoimmune mediated heparin-induced thrombocytopenia, allergic reactions and the potential for bleeding complications following multiple, unmonitored heparin flushes.
- This can be achieved by aspirating the heparin flush from the line, when it is next accessed, and before flushing the line, so the heparin is not administered to the patient.
- Careful prescription and documentation of all heparin flushes should occur
- Care should be taken to avoid common problems with heparin use, such as;
- Confusion with other ‘look-a-like’ products.
- Using unlabelled heparin syringes.
- Errors in calculating and diluting heparin.
- Incompatibility of heparin with other medicines.
- Administration of incorrect strength of heparin i.e. 10,000 units per mL instead of 10 units per mL resulting in the deaths of three infants
4.48 Aspirating blood samples
- In general, it is not appropriate to try and aspirate blood samples from the small single lumen tunnelled lines, which are used for babies on the neonatal unit.
- If you do plan to aspirate blood from a line, the rule about syringe size is the reverse from when flushing. A smaller syringe will exert a lower pressure on the line when aspirating and a larger syringe will exert more pressure. Therefore, when aspirating, the smallest appropriate syringe size should be used.
- Where there is a choice the largest lumen of a multi lumen line should be used for blood withdrawal.
- Remember to withdraw fluid/blood to allow for waste/dead space within the line. This is blood that has been in the line and is contaminated by the fluids or medication which has most recently been given down the line. If used for blood tests, the test results will not be accurate.
- This ‘waste blood’ will be withdrawn and put to one side, whilst the pure, uncontaminated blood is aspirated from the line- to be used for required blood tests, If the baby is greater than 3 kg and has infrequent blood tests, this blood may be discarded. However, if the baby is small, unwell, or requiring regular blood tests, this blood should be returned to the baby, and the line flushed.
- The minimum volume of waste blood will depend on the size of the line- with 3 x the catheter volume being recommended by manufacturers. In neonatal practice 2-3 mls should be sufficient for most babies nursed on a neonatal unit.
- Ensure you keep this syringe of waste/ blood clean and separate so that it is not accidentally used for blood tests.
- Take care to proceed steadily, but not slowly when aspirating blood, as the waste blood will be returned to the baby to help maintain their haemoglobin levels and you do not want clotting to begin to occur in the syringe.
- If there is any concern that the blood/waste is clotting or contaminated, it will need to be discarded.
- Give a generous flush with 2-3 mls of saline after use, to ensure the blood has been cleared from the line.
- A turbulent (push pause) flushing technique can be used if you are concerned about blood residue remaining in the internal lumen of the catheter. This can be done by firmly pulsate 1ml at a time of flush into the catheter, so creating turbulent flow within the lumen, thereby decreasing the risk of fibrin and platelets becoming adhered to the internal wall of the CVC and minimising occlusion.
- Be aware that coagulation and drug levels obtained from lines may be inaccurate due to heparin flushes used to maintain the line patency, and traces of drugs previously given down the line, contaminating blood samples. This is true, even when a waste blood sample is removed first.
4.49 Dressing
- Maintaining the dressing site is important to reduce the risk of infection and to minimise the risk of line dislodgement, fracture or accidental removal.
- Line dressings should be changed weekly, or more often if required. This will require the dressing to be carefully removed, the site cleaned, and a new dressing applied.
- Assess the line site prior to preparing for dressing so that the correct equipment can be prepared and minimise any delays.
- If an allergy to any dressing is suspected, a barrier film, such as Cavilon™, may be used to protect the skin prior to a dressings’ application for sensitive skin or those with mild reactions/irritation.
- In the more well / active post term baby, ensure the line tubing is tucked away when not in use and is not allowed to hang down outside clothing. However, do not tuck the catheters ends into the nappy as this would be unhygienic.
4. 410 Dressing change procedure
- As per general principles for all procedures. Collect equipment, this may include the following:
- Sterile dressing pack
- new clear semi-permeable dressing
- sterile wound closure strips (e.g. Steri-Strips®)
- spare pair of well-fitting gloves
- receptacle for holding discarded equipment/dressing at bedside
- pack of sterile gauze and 0.9% sodium chloride if there is ooze/debris
- wound swab if site looks concerning
- adhesive removal fluid (ie Apeel)
- Open the dressing and wound closure strips and take out of packaging placing. Place them inside the opened dressing pack, leaving the protective backing on them.
- Open the saline and pour into receptacle in dressing pack.
- Prepare baby for the dressing change, remove any clothing / vests etc.
- Using clean non-sterile gloves and adhesive removal fluid, remove old dressing, being particularly careful around the exit site not to pull line. When the dressing has been removed, perform hand hygiene and change to a new pair of sterile gloves from the dressing pack.
- Skin cleaning will be required if there is blood/ooze present. Any blood/ooze adherent to the skin and catheter can be gently removed using sodium chloride 0.9% and sterile gauze.
- Loop or curve/S shape the catheter onto the chest and secure with the wound closure strips. Ensure they do not cover the exit site.
- Take off protective cover of the dressing and place dressing over the catheter, ensuring it covers the exit site and the reinforced section of the catheter. Take care not to stretch or use pressure when applying the dressing.
- Discard of soiled items and perform hand hygiene.
- Ensure baby is comfortable and redressed.
- Document dressing change, including commenting on the condition of the exit site, in the nursing documentation.

For process of medication administration via a tunnelled line, see Appendix 2.
4.411 Line infections
- Infection is the most common complication with lines and can manifest itself in several different sites. The sites of infection associated with tunnelled lines include;
- exit site infection
- tunnel infection
- internal lumen infection
4.412 The exit site
- The exit site must be monitored daily for any signs of infection or dislodgement. These include:
- redness
- swelling
- pus
- pain or discomfort
- bleeding
- phlebitis can be seen with PICCs
- increased length of catheter
- visible cuff
4.413 Skin tunnel
- Skin tunnelled lines can develop an infection within the skin tunnel. Therefore, the area on the baby’s chest, under which the line passes in its tunnel should be monitored for any of the following signs;
- inflammation
- red tracking following the path of the catheter
- pain or discomfort
- high temperature
- pus from exit site
- Tunnel infections generally tend to occur within 72 hours of tunnelled lines insertion.
- Management of tunnelled line infection is beyond the scope of this guideline. Please refer to local medical guideline and the local paediatric infectious diseases service.
4.414 Suspected line infections
- If an infection is suspected, swabs of all oozing wound sites need to be taken and blood cultures drawn from all lumens of the line- if able. Line infections are serious and potentially life threatening.
- Suspected internal catheter related infections are likely to be treated using intravenous broad-spectrum antibiotics until culture and sensitivity results are available. These will usually be given down the line as an attempt to treat the infection at its source.
- Exit site infections in a baby who is otherwise well can often be treated with oral antibiotics.
- If the line is multi lumen, alternate lumens must be used for antibiotic administration, even if only one lumen shows positive cultures. This ensures that each lumen is treated for possible cross contamination.
- If the baby’s clinical condition deteriorates, depending on clinical advice, the line may have to be removed.
- If the infection requires the removal of the device, it is essential that adequate time be left between removal and re-insertion. Best practice suggests that peripheral blood cultures should be taken prior to a new line being inserted in patients who have had the tunnelled line removed due to infection.
4.415 Line occlusions
- Occlusions resulting in loss of line patency can result in delayed treatment, and family distress and can also increase the risk of infection.
- Tunnelled line occlusions can result from a number of reasons. These include;
- catheter tip malposition
- intraluminal clot
- intraluminal drug precipitate
- fibrin sheath/tail
- catheter kink
- “pinch-off”
- catheter related thrombosis
- suture constriction
- catheter rupture
- The above can result in either narrowing or total occlusion of the line.
- Where a blood clot is suspected to be the cause of obstruction, thrombolytics can be used to attempt to restore catheter function. A separate medical guideline should be referred to for this procedure.
4.416 Line fracture/damage
- All lines can split, develop holes or fracture, both internally and externally. Great care should therefore be taken to minimise the risk of catheter breakage. Both through careful handling and use of the line, and effective and secure dressing of the line.
- Internal damage will require complete line removal. Because the broken segment may move, dropping further into the venous system, where it could result in catheter emboli.
- If a line is damaged externally, they can usually be repaired without the baby requiring surgery for a new device providing there is at least 5cm/ two inches of undamaged catheter between the break/hole/split and the exit site.
- If the external section of the line is damaged, immediately ensure that the device is clamped with two atraumatic clamps, above the damaged section of the catheter (between the break/hole/split and the exit site) A layer of gauze is usually placed between the clamp and the catheter as plastic or metal clamps can potentially lead to further catheter damage. An occlusive dressing is then placed over the hole/split/break.
- Contact the relevant person urgently, who will facilitate the repair of the device: This is usually someone from an intravenous therapy team, paediatric clinical specialists in intravenous therapy or oncology, or possibly paediatric surgical teams.
4.417 Accidental catheter removal
- If the catheter is completely pulled out, digital pressure needs to be applied immediately to the site where the catheter enters the vein for about five minutes until haemostasis has been achieved.
This will usually be in the neck region. A small scar site used to insert the CVC is usually visible which shows where pressure needs to be applied.
4.418 Removal of tunnelled lines
- Lines must be removed in theatre/interventional radiology and should not be removed in the ward environment.
- For neonates, this will routinely be carried out under a general anaesthetic.
4.5 Arterial Lines
Arterial lines are most commonly sited in the newborn neonates in one of the umbilical arteries of the recently separated umbilical cord stump. The indwelling catheter- of the umbilical arterial catheter (UAC) is able to continuously measure arterial blood pressure, when it is attached to a medical device. The blood pressure is displayed on the patient monitor as a wave form and also gives continuously changing values for the diastolic, systolic and mean blood pressure of the patient.
Invasive (direct) blood pressure monitoring provides more accurate readings than non-invasive (indirect) techniques, especially in the critically ill. Arterial lines can also be used for blood sampling.
If the neonate is not newborn (ie first 1-2 days), the umbilical cord vessels will generally be too desiccated to access the artery. Instead, the medical team may then choose to site a peripheral arterial line. This requires that a cannula be sited in the radial or posterior tibial arteries using a percutaneous puncture. Brachial arteries should be avoided as there are more risks associated with their use.
Care of the arterial line is more important than the site chosen for insertion.
- The components of an arterial pressure monitoring system are;
- An indwelling line/ cannula from which arterial pressures are continuously measured.
- An arterial line set.
- A valved flow-limiting device connected to a syringe pump or arterial line pressure bag.
- The arterial line set has access ports or 3-way taps (3WT).
- The arterial line is attached to a transducer that enables the mechanical energy of the arterial pressure to be transformed into an electrical signal for display as a waveform.

4.51 Insertion of umbilical arterial line
- The line will be inserted by the medical team or nurse practitioner, but the nurse caring for the baby will need to;
- Position the baby so that they will be comfortable and safe during the procedure. For example so the baby is nested, the abdomen is uppermost and can be accessed without excessive twisting or manipulating.
- Ensure that procedural lights will not be beaming into the baby’s face. Sometimes it will be best for a baby to wear phototherapy eye protection for the duration of the procedure.
- Assist with opening or passing equipment as required during the procedure.
- The procedure is not painful, as the umbilical cord has no nerve supply, however the baby may require reassurance and/ or comfort. For example a pacifier for non-nutritive sucking, comfort holding, and/ or a finger to hold.
- A large and vigorous baby may require gentle restraint to stop them moving, so that the procedure can be performed safely.
- If a parent will be present, explain the procedure to them, and explain how they can support their own baby.

4.52 Confirmation of arterial line position
- As soon as an UAC is sited, some fluid must be administered through it to keep it patent. This will usually be 0.5ml/hr of 0.9% saline, through a syringe pump.
- Before a UAC can be used for transducing blood pressure, its position must be confirmed. The line can be aspirated, to check for blood return, but this method is NOT an accurate means for assessment of the position, as it does not show the position of the catheter tip internally.
- UAC position must therefore be checked by performing a chest X ray. Confirming the position of the UAC tip inside the baby is important, to help minimise the risk of blood flow obstruction to which can pose serious health risks.
- The x-ray will be reviewed by the medical team or specifically trained nurse practitioners. If the line is in the correct position they will confirm this to the nurse looking after the baby and it will them be possible to commence administration of fluid and medication through the line. If the UAC position is in the incorrect position, then the medical team or nurse practitioner team can pull it back by 1-4cm, as required but cannot push the line in further, for sterility reasons.

4.53 To set up an arterial line monitoring system;
- Prepare;
- arterial line set
- heparinised 0.9% sodium chloride
- haemodynamic monitoring system – monitor and compatible transducer set
- syringe pump and 50ml syringe
1 – Check the arterial transducer set for any faults or loose connections.
2 – Using ANTT, prime thoroughly with heparinised 0.9% sodium chloride.
3 – Ensure that:
-
- air is thoroughly removed from the arterial line set
- all connections are secured, primed and airtight
- all ports are thoroughly primed
- the system is clearly labelled
4 – Attach arterial line set to the transducer and monitor.
5 – Calibrate the transducer following the manufacturer’s instructions.
6 – Observe arterial trace on the monitor for appropriate waveform.
7 – Dispose of all equipment correctly as per disposal of used sharps policy.
- Ensure the waveform displayed on the screen is set to the best scale, to display the waveform.
- Adjust the upper and lower and mean alarm limits: to those required for the baby. It is usually desirable to maintain the baby’s blood pressure mean at or above their current gestational age. However, the exact values will be determined by the gestation of the baby and their medical condition (ie cooled, cardiac complications, requiring inotropes.) Seek clarification of acceptable range of values from the medical team or senior nursing colleague, if uncertain.
- Document the line insertion/ cannulation in the baby’s health care records.
- Blood pressure recording maybe compared to non-invasive blood pressure recording as required or according to local policy.

4.54 Calibration
- The transducer must be calibrated;
- Following insertion of an arterial cannula.
- At the beginning of every shift.
- Whenever the child’s position is changed.
- When transducer set is changed.
- The position of the baby can be either lying flat or with their head elevated, but not at an angle of more than 45 degrees.
- To calibrate the transducer
- Position the transducer so it is level with the right atrium
- Turn the 3WayTap off to the child
- Turn the 3Way Tap on to the atmosphere (air).
- In the setup menu for the pressure, select zero ‹press›.
- When you see the message zero done turn the 3WT off to the atmosphere and turn the 3WT on to the child.
4.55 Ongoing care
- The baby should be nursed in an incubator or under a radiant heater. This will enable the baby to be nursed exposed ensuring the insertion site to be easily observed.
- The baby should have ECG lead monitoring, to check for arrhythmias and general deterioration.
- It is imperative that arterial lines are clearly labelled as arterial, to distinguish between venous and arterial catheters.
- Drugs and hypertonic solutions must never be given via an arterial line. This may cause spasm severe enough to obstruct all blood flow through the artery.
- The length of insertion of a UVC and/ or UAC must be documented on a daily basis.
- In neonates the delivery methods of intra-arterial infusion is a syringe pump with a variable pressure alarm, which provides accurate fluid administration and an alarm monitor for prompt.
- To maintain patency heparinised 0.9% sodium chloride should be continually infused through the line.
- The recommended concentration is one unit of heparin per ml of 0.9% sodium chloride, which is administered at a rate of 0.5ml per hour.
- 45% sodium chloride maybe used in neonates with high serum sodium, under medical agreement.
- Record hourly heparinised 0.9% sodium chloride or approved fluid on the fluid balance chart.
- Do not allow air to enter the system. Air entry may result in an embolus in the baby’s distal arteries.
- Documenting blood pressure readings hourly (more frequently if the patient’s clinical condition dictates.)
- Standard (universal) precautions and an aseptic non-touch technique (ANTT) must be adhered to when siting, manipulating, accessing or removing an arterial line.
- The umbilical/ or cannula site must be exposed and continually observed, so the neonate must be nursed in an intensive care area and not left unattended.
- There is a risk when medical instruments such as scalpel, scissors, stitch remover are used near an arterial line, that the umbilical catheter could be accidentally cut through or damaged. This occurs most frequently when lines are being inserted, removed or repositioned.
- There is a risk of causing acute blood loss, and a hypotensive/ hypovolaemic emergency for the infant. Therefore learning points have been identified for medical and nursing teams, from such incidents, to help minimise the chance of this occurring again. These points include;
- Complete a safety pause and consider if the environment is appropriate to carry out the task. A ‘procedure in progress’ sign can be used.
- Have forceps available at the bedside when UAC catheter removal is occurring, so the umbilical stump can be clamped immediately if required.
- Stich cutters should be used to cut any stitches around a UAC not scalpel or scissors.
- The stich cutter should face away from the line during use.

4.56 Aspirating Blood Samples
- Only a trained and competent practitioner may withdraw blood.
- The syringe of heparinised saline must be changed every 24 hours.
- The administration set must be changed every 72 hours or more frequently if clinically indicated.
- Following blood sampling, always flush the line to clear any residue of blood. Otherwise blood left in the system may clot and affect the quality of the trace. The line may also be blocked, stop working and need to be removed.
- Avoid nursing the baby prone when a UAC is in situ. If the baby must positioned prone an adequate period of observation of the umbilicus should occur before this occurs. Ideally the cord should be dried around the line, rather than moist. Some units will lay the baby on something white that would wick the blood, making any blood loss more likely to be noted.
- Potential problems associated with arterial lines are;
- Decreased or absent pulse distal to the puncture site.
- Bleeding back into tubing or transducer.
- Emboli.
- Pneumothorax.
- Cardiac arrhythmias.
- Haemorrhage – due to accidental disconnection or from open connections.
- Infiltration/extravasation.
- Phlebitis.
- Local/ systemic infection.
- Thrombosis – may involve femoral artery resulting in limb ischaemia.
- Thrombosis- may involve renal artery resulting in hypertension, haematuria and renal failure.
- Thrombosis- may involve mesenteric artery resulting in gut ischaemia and necrotising enterocolitis.
- Vasospasm of the femoral artery causing blanching of toes and foot.
- Embolism from blood clot or air in the infusion system.
- Because of this, at least every hour the perfusion and blood flow to the trunk and lower limbs must be checked and documented. This includes the toes, feet, legs, and buttocks. All observations must be recorded in the nursing records.
- Observe the tissue surrounding the line for signs of infection. These include;
- pain
- redness
- pus
- temperature change
- swelling
- Any changes in colour, warmth, capillary refill must be reported to the medical team. For, if blood flow to part of, or all the lower limb is interrupted, the baby’s limb or part of the tissue can very rapidly be affected or become ischaemic and permanently damaged.
- Early signs of concern to report to medical team;
- Duskiness of one or more toe- that may be transitory.
- One limb appearing more mottled than the other.
- The limb or area of skin blanching when the line is flushed or aspirated.
- Limb or part of limb feels cool to the touch.
- Cyanosis.
- Later signs where the line will need to be removed urgently, and action taken to restore blood flow;
- One or more black toe, or part of toe.
- One limb being white and appearing shut down.
- Decreased pulse.
- Pressure ulcers/ bleeding.
- Limb or area of skin blanches when line used- but recovers very slowly- or not at all.

- The line must also be removed whenever;
- bacteraemia is suspected
- local infection noted
- it is no longer necessary
- arterial trace has been lost and unable to sample despite troubleshooting.
- Accidental removal of the arterial cannula will require immediate application of pressure to the site for five to 15 minutes or until bleeding has stopped.
The guideline written above, about care of a UAC can be applied to care of the Peripheral Arterial Line (PAL). However, where trunk and lower limbs are referred to, this should be substituted for limb and digits distal to the arterial catheter.
Deviations or additions to this include;
4.57 Points specific to caring for a baby with a Peripheral Arterial line. (PAL)
- The cannula must be secured with a sterile clear dressing and anchored with skin closure strips.
- A clear dressing should be used to cover the cannula.
- Ensure the cannula is secure and immobilised with a splint.
- Observe for signs of cannula displacement into the tissues which will be;
- swelling
- bleeding
- lack of a normal arterial waveform
- fluid leakage
- blanching
- pain or discomfort
- Observe for bleeding due to cannula movement within the vessel.
- Change the dressing if:
- it is ineffective in securing the cannula
- it is not keeping the site of entry clean
- the cannula is kinked under the dressing
- bleeding has occurred
4.58 Trouble Shooting – Dampened trace – No trace, intermittent or poor quality trace.

- Assess patients’ cardiovascular status, including pulse check, ECG waveform and non-invasive blood pressure, to assess if this is a problem with the baby or the equipment.
- Check arterial line site, all connections and infusion device flow rate.
- Check an appropriate arterial scale has been set up on the monitor.
- Check arterial line set (especially 3 way tap) for clots, air or inadequate filling, any kinks in the tubing and change entire system if necessary.
- Check blood can be easily aspirated at access port.
- Attempt to aspirate any clot, using 2ml of heparinised sodium chloride syringe. Lightly ‘bounce’ plunger to loosen blood clot.
- Do not forcefully flush catheter if resistance is high.
- Redress cannula site, check for kinks or poor positioning of cannula.
- Reposition the baby or their cannulated limb.
4.59 Trouble shooting – Abnormal readings. – Abnormally high or low readings must be investigated
- Assess patient’s cardiovascular status, including pulse check, ECG waveform and non-invasive blood pressure to ensure it is a monitoring problem, not a change in the child’s condition.
- Position transducer level with right atrium.
- Ensure correct tubing of minimal length used.
- Recalibrate transducer.
4.510 Trouble shooting – Bleeding puncture site- If bleeding occurs at the insertion/ puncture site
- Apply firm pressure to umbilical cord just below site of entry/ or cannula insertion site for five to 15 minutes.
- Ensure catheter is adequately sutured/ cannula is securely strapped.
- Ensure line is immobilised/ try to limit movement of active baby by nesting, gentle containment holding, offering dummy- if appropriate.
- Check circulation in extremities.
- Bleeding will usually settle with time and appropriate pressure. If it is prolonged the baby’s clotting may be deranged and should be checked.
4.511 Trouble shooting- No waveform- If there is no waveform visible on the monitor;
- Assess patient’s cardiovascular status, including pulse check and non-invasive blood pressure to ensure it is a monitoring problem, not a change in the child’s condition.
- Check system is correctly set up and attached.
- Check appropriate arterial scale in use on monitor.
- Check monitor display settings correctly set.
- Try an alternative transducer and module.
- Get advice from more experienced colleague.
- Consult clinical engineer.
4.512 Trouble shooting – Electrical interference- If electrical interference is experienced.
- Inspect transducer and cable for cracks.
- Use another transducer.
- Consult biomedical engineer.
See Appendix 3 – for a description of the process of taking blood samples from an arterial line.
4.513 Removal of arterial cannula
- The arterial line / cannula should be removed when
- limb / trunk circulation is compromised
- the cannula is misplaced
- it is no longer required for monitoring and frequent blood sampling
- there are signs of an infection
- This should be reviewed daily by the medical team
- The prolonged use for more than a week of an UAC may increase the incidence of abdominal symptoms and alter the intestinal blood flow.
- Standard precautions must be adopted when removing an arterial line, ie non-sterile gloves, visor and an apron. ANTT must be used.
- Gather the following equipment:
- Sterile dressing pack with sterile gloves
- sterile gauze
- surgical tape
- small sterile plaster (if required)
- stitch cutter (if required)
- To remove the line:
- Perform a social hand wash.
- Gather equipment required (see above).
- Open packaging.
- Place equipment on clean tray using ANTT.
- Perform hygiene hand wash and put on sterile gloves.
- Loosen all dressings.
- Cut retaining suture if present and withdraw the line from the artery without applying pressure.
- The catheter should be checked on removal to ensure it is intact.
- Using the sterile gauze immediately apply pressure for up to five minutes or until bleeding has stopped.
- For a PAL, apply a sterile plaster or a pressure dressing over the arterial line site.
- Observe the site regularly for bleeding every five minutes for the first 15 minutes, then every hour.
- The infant should be nursed supine for at least six hours to observe the umbilical stump for excessive ooze or haemorrhage.
Appendix 1. Medication administration via a tunnelled central line- Bolus.
- Prepare required equipment. Likely to include the following;
- 10ml syringes
- other sizes of syringes for dose accuracy
- needles to draw up the required solutions
- medication(s) and appropriate diluent to prepare if required
- 9% sodium chloride for injection/5% dextrose or appropriate fluid depending on medication compatibility
- required amount and strength of heparin- if the line is not in continuous use.
- 2% chlorhexidine in 70% isopropyl alcohol wipes
- Caps for protecting key parts- if used locally
- Before commencing ANTT;
- Work out any medication calculations
- Collect medication vials or pre-prepared medication syringe
- Write out any medication labels that may be needed
- Ensure familiarity with administration method and process and timing.
- Procedure;
- Open equipment by carefully peeling back packaging.
- Place syringes into the pre-prepared tray ensuring key parts are uppermost ie not in contact with the tray.
- Connect the needles to the syringes as required. Draw up the 0.9% sodium chloride and heparin as required. Ensure all key parts remain uncontaminated.
- Using the same technique detailed above. Draw up all medication(s), flushes, heparin and diluents required for the procedure.
- Cover all exposed syringe tips with white caps taking care not to contaminate key parts when placing them on and removing prior to use.
- Label syringes.
- When all medication(s), flushes, etc have been prepared, take tray and necessary prescription to the baby.
- Check the patient’s name band against prescription chart to correctly identify patient.
- Locate the line to be used and if applicable, identify the lumen to be used. If fluid is running via the line, this will need to but put on hold and all ports/ tubing clamped except the one that will be used for medication.
- Clean the needleless access device with the 2% chlorhexidine in 70% isopropyl alcohol wipe for 30 seconds using friction and allow to dry naturally. Visibly check the device is dry.
- Insert 10ml syringe of 0.9% sodium chloride or compatible diluent into the needleless access device. Open the clamp of the line if present and inject flush into the line to ascertain its patency.
- When the patency of the device has been established, remove the syringe containing the flush and insert the syringe containing the drug. Administer the medication over the required time observing the patient and line at all times.
- Following the procedure above, administer all required medications ensuring adequate flushing between each of the medications to prevent mixing of incompatible medications.
- Attach the flush syringe to the needleless access device and gently instil the first part of the flush. If fluid will be running again via the line then clamp closed the port and then open the other ports which had been open previously and recommence infusions.
- If the line will not have fluid running through it after wards, consider giving a turbulent flush as described previously in section 4.45 above or on Page 20 of pdf guideline.
- Administer heparin flush, as required by local policy and prescribed. Use positive pressure when flushing off the line.
- Follow end of procedure principles for disposal and decontamination.
- Complete administration documentation.
Appendix 2. Medication administration via a tunnelled central line- Infusion
- The procedure will be very similar to that used for bolus medication administration. However, at point 12, on page 40 (above) the tubing for the infusion will be attached and an infusion set up using supplied local infusion device.
- If the baby’s previous running maintenance fluids are not compatible with the infusion, they will need to be turned off for the duration of the infusion.
- Care must be taken to ensure the baby continues to receive enough fluid volume and energy supply to keep them safe during the infusion period, which may be from 10 minutes to a number of hours.
- Care will also need to be taken, to ensure all the correct infusions are restarted once the medication has been given, and that the line is never left without fluid running through it, if it has not be safely flushed and clamped off.
Appendix 3. Blood sampling from an arterial line (umbilical or peripheral)
- Only staff that have received appropriate training and are competent should access an arterial cannula to take blood samples.
- The procedure must be stopped and assistance sought if any of the following occur:
- resistance is felt
- the baby appears to be in pain
- swelling is observed around the entry site
- leakage of fluid onto dressing
- redness around the arterial line site or along the artery
Procedure:
- Depending on the blood tests required gather the suitable equipment. This could include:
- blood bottles or vacuum collection systems
- one x 2.5ml syringe (for dead space)
- one x 2.5ml syringe (if required for bloods samples)
- one x 2.5 ml syringe (for saline flush)
- wipes impregnated with two per cent chlorhexidine in 70 per cent alcohol
- sterile port protector (such as 3M™ Curos™ )
- syringe cap
- protective sheet/paper towel
- non sterile gloves
- Vial of 0.9% saline or 0.45% saline
- Sterile technique must be adopted when blood sampling from an arterial line, ie sterile gloves. If it is difficult to obtain blood, seek assistance from a doctor or an experienced practitioner.Put on clean apron and visor
- Gather equipment required
- Perform a hand wash and put on sterile gloves
- Open packaging.
- Place equipment the sterile field
- Place protective sheet/paper in the appropriate place, below the 3 way tap that will be accessed.
- Draw up 2-3 mls of saline 0.45% or 0.9% according to local policy
- Remove the chlorhexidine impregnated cap from the hub of the sampling port, if used locally.
- Clean hub for 30 seconds using friction with a two per cent chlorhexidine in 70 per cent isopropyl alcohol wipe and allow to dry naturally.
- Connect 2-5ml syringe.
- Open 3 Way Tap to baby and syringe and withdraw 2mls of blood (dead space)
- Turn 3 Way Tap off to baby
- Remove the syringe and place the syringe on a clean tray.
- Re-access the device using a 1 or 2.5ml syringe.
- Open 3 Way Tap to baby and syringe and withdraw the required quantity of blood.
- Turn 3 Way Tap off to hub.
- Remove syringe containing the blood sample.
- Place the cap on the sample or ask colleague to transfer blood to a blood gas tube, or specimen bottle for collection.
- Pick up syringe containing 2 mls of blood aspirated first and ensure no air is in the syringe.
- Reattach this syringe to hub
- Open the way tap to syringe and baby and inject steadily, to return blood to baby.
- Turn 3 Way Tap off to hub
- Pick up syringe containing saline and attach to hub
- Open 3 Way Tap to hub and baby and flush line with saline, until blood is cleared from line between three way tap and the baby.
- Turn 3WT off to baby and remove saline syringe.
- Open the infusion and wipe hub with impregnated alcohol wipe.
- Attach a chlorhexidine impregnated cap and switch all alarms back on.
- Observe trace and check the parameters are set appropriately.
- Place the blood collected in the appropriate bottles if required and or run blood gas.
- Observe the monitor for normal trace
- Ensure the arterial line is secure
- Label the samples and send them with the completed request forms to the correct laboratory.
- Record the taking of the blood sample in the baby’s health care records.
Appendix 4. Vascular Access Guideline: What & Where
Aims
- Advise on appropriate vascular access routes and type of catheter for drug delivery and nutrition according to gestation and clinical status
- Target appropriate use of central line access to minimise painful procedures, as well as preventing unnecessary insertion of arterial/central lines
Quick Reference Guide
UAC
- ≤26 weeks
- <800grams
- frequent blood/ BG sampling ( >4hrly)
- Cardiovascular instability requiring invasive measurement
- Therapeutic Hypothermia
Peripheral Arterial Line
- Where UAC not available
- Dilutional exchange
UVC (double lumen preferred)
- When UAC inserted (see indications above)
- Emergency access for drugs
- Administration of drugs requiring central access
- Exchange transfusion
- IV access when peripheral access is unobtainable
PCVC (single lumen preferred)
- ≥27 weeks and ≥ 800grams on admission (without indications for UAC/UVC) where there is an anticipated need for TPN > 5 days
- Ongoing need for central line infusions following removal of UVC
- Administration of drugs requiring central access
- Administration of prolonged course of IV therapy
- IV access when peripheral access is unobtainable
PCVC (2F double lumen)
- Two IV drugs required over a prolonged period
Types of Vascular Access
- Vascular access includes arterial, central venous and peripheral venous access.
- The unit procedure form should be completed for insertion and removal of arterial and central venous access.
Arterial Access
This applies to
- Umbilical Arterial Catheter (UAC)
- Peripheral Arterial Line
Indications:
- Invasive blood pressure monitoring is required
- Where capillary blood gas sampling is contraindicated, e.g.
- poor peripheral perfusion (hypotension/therapeutic hypothermia)
- immature skin at risk of breakdown (infants ≤26 weeks gestation)
- poor heel skin integrity
- frequent blood gas or other blood sampling
- Removal of blood during dilutional exchange (peripheral arterial line or UVC preferred, rather than UAC)
- Need for ongoing arterial access should be reviewed daily and removal should occur as soon as possible
Which artery to cannulate:
- UAC should be used in preference to peripheral arterial lines (except for dilutional exchange) particularly in smaller infants.
- Do not cannulate ulnar artery if radial artery has already been punctured or cannulated.
- Perform modified Allen’s test before cannulation of radial artery.
- In general, avoid cannulation of end arteries g. brachial/ femoral/dorsalis pedis/temporal artery as collateral supply is limited. This must be a consultant decision.
- Femoral arterial catheterisation, however, may be helpful in larger infants where UAC access is not possible, but this should be a consultant decision and should only be undertaken by experienced personnel.
Follow individual procedural guidelines for placement of UAC and peripheral.
Version Control
| Version | Date | Details | Author(s) | Comments |
| 1 | Sept 2019 | New document- | written by TVNODN, Quality Care Group | Circulated for review by lead nurses and practice educators.
|
| 2 | Dec 2024 | Review and update of Guideline. | TVWNODN Guideline group members. | Ratified at Governance Meeting December 2024. |
| Review Date: | December 2027 | |||
Document version
Version 2
Lead Authors
Thames Valley & Wessex Neonatal ODN Guidelines Group
Approved by
Thames Valley & Wessex Neonatal Network Governance Group
Approved on
12 December 2024
Renew date
December 2027
Full guide
Related documents
References.
Ansary.A (2019) Arterial Line analysis. ICU Professor, Ain Shams, Cairo. Egypt. Found at; https://www.slideshare.net/samirelansary/arterial-line-analysis-46584416
ARHAI Scotland (2022) Quality Improvement Tool (QIT) Literature Review. Insertion and maintenance of Central Venous Catheter (CVC) V1 Dec 30th 2022. NHS National Service Scotland. Found at
https://www.nss.nhs.scot/media/3533/nipcm-literature-review-cvc-v10.pdf
BAPM (2015) Use of Central Venous Catheters and Neonates. A framework for practice. Revised Aug 2018. British Association of Perinatal Medicine.
Clarkson. R (2018) Arterial waveform analysis. @Insight health data science. Found at http://www.rebeccaclarkson.com/blog/artform/
Collins.E (2018) Nursing guideline for care of a Hickman line. Oxford Newborn Care Unit. Oxford University NHS Foundation Trust.
Deindl.P et al (2017) Arterial catheterisation in neonates can result in severe ischaemic complications but does not impair long‐term extremity function. Acta Paediatrica, Vol 107, No 2, pp240-48.
Firth C et al (2022) Insertion of Umbilical Lines in Neonates. Bradford teaching Hospitals NHS Foundation Trust. Found at;
Implications of race, equality & other diversity duties for this document
This guideline must be implemented fairly and without prejudice whether on the grounds of race, gender, sexual orientation or religion.